Wednesday, August 31, 2011

Tuesday, August 16, 2011

Sweet Paratha.

Belated Indian Independence day wishes to all my readers and friends. Here is a healthy dessert idea for the oncoming Vinayagar Chathurthi festival. Happy celebration to all!

This is a green gram based boli / poli/ stuffed paratha.

Some months back I prepared this  paratha, when hubby had a different work schedule. I prefer giving a homemade snack pack especially on such days, so that I can track what he eats:) The beauty of this paratha is the rich fiber content with some jaggery. As we all know how fiber gives a 'fullness' feeling for a long time and so this can be a perfect choice for an evening snack. I prepared the stuffing on the previous day and kept it refrigerated. The next day by early morning I prepared these parathas, let them cool and kept them in rubbermaid lunch box. I am glad that everyone liked it. I am sure this will be a great choice for kids who prefers stuffed parathas for lunch.


Outer layer:
Wheat flour - 1 1/4 cup
Turmeric powder - 1/4 tsp
salt - a pinch
Sesame oil - to make paratha

Mix the flour, salt, Turmeric powder.
Add water little by little to get a thick chapathi dough like consistency. Coat it with little sesame oil and cover it with a wet cloth / clear wrap.We can prepare this dough and keep in fridge overnight.
Before making the paratha leave it in room temperature for 1/2 an hour. After that divide the whole dough into 12 (or equal size balls) portions.Shape them in to balls. Keep aside.

Stuffing:
Green gram - 3/4 cup
Jaggery - 3/4 cup
cardamom powder - a pinch
shredded coconut - 1/4 cup (optional)

Method:
Soak the dhal for 2 hours. Cook and remove the water. Mash the moong gram. (We can use the water to make rasam / soup). Mash the dhal to fine paste using a mixie / a spatula. Heat 1/4 cup water and dissolve the jaggery in it. Then filter any dust / sand present. Mix the jaggery solution with mashed dhal and heat it in a wok. Add coconut and powdered cardamom now. Let it loose all the moisture and become a thick mass.
Switch off stove and let it cool. Divide it in to equal size balls.

To prepare paratha:
Take one 'wheat flour ball'. Apply oil to it. Using a rolling pin flatten it to a circle. Do not use flour to spread the circle. Instead apply oil generously to spread it.
Take one 'stuffing ball'. Place it on the center of the circle.
Now fold it with the covering dough closely , so that no stuffing can be seen from outside.
Now again apply some oil and carefully spread it to a thin circular shape (approximate diameter should be 5 - 6 inch). Don't worry if you see some pooranam from inside in this stage, as it will become fine after frying.
Heat a dosa tawa. Evenly apply sesame oil on the tawa .Reduce flame and fry the bolis on both sides till we see some brown dots all over.
Again increase the heat, apply little oil, reduce heat and fry the bolis in lesser heat.
Take out , let cool and store in a container.
Like wise proceed with the rest of the dough.
Sweet paratha is ready!

Serving suggestions:
Serve as meal or evening snack.
Makes 12 numbers (approx) .
The leftover boli (if any) can be wrapped in ziplock covers and kept refrigerated for a week.

Note:
Like wise we can make numerous verieties of sweet stuffed bolis like, coconut boli , date fruit boli, sesame boli, fruits boli, ghee boli, Jeera boli (boli soaked in sugar solution) etc.

Thursday, August 11, 2011

Kaju Katli

Wishing all my friends and readers a happy and blessed Varalakshmi Nonbu!

Hope many are busy with the Varalakshmi Nonbu pooja preparations. Here is an extremely easy dessert to make this day more special and let it be a good start.

Cashew burfi or kaju kathli is a famous dessert available in almost all the sweet stalls of India. It will be the first choice for many who do the snack shopping while planning to meet a friend or family.

Memories: Mom would buy some broken cashews (the powdery one we get for making kuruma) and do this. Her method involves soaking the cashews in milk for a couple of hours and make a fine paste out of it. Then She would prepare a sugar syrup of 2 string consistency and add this cashew paste,  little ghee. Then she would stir it in low heat till it starts leaving the sides and pour them on a ghee greased plate to make slices.
I have tried this before and I am sure it will be extremely delicious.

But I am describing a much easier version which I got from my friends. I think this is a short cut and much prevalent than my mom's:) Anyways we won't go wrong with any of these methods.

A box full of happiness and smile......Kaju katli:)

Ingredients:
Cashew nut (broken) - 1 cup
sugar - 1 cup
ghee - 1 tsp
water - 1/4 cup

Method:
Powder the cashew to a fine state.

Pour the water and sugar in a wok and start heating. Let it come to a boiling stage. Then reduce flame and heat till we get a single thread consistency.
Now add the cashew powder and mix well. Reduce flame to the lowest and stir continuously till it starts leaving the sides. Switch off.
Let it cool slightly. Now knead it like chapathi dough with ghee and place it over a clean plate / countertop. If powdery add a few drops of milk (or) if it is loose them MW it / stir in low flame again. It should be like a dough and much workable.
Press with a rolling pin and flatten it to 1/2 inch thick sheet. Make diagonal lines and cut that into 2 inch diamonds.

Place them on a greased plate and cool completely. Store in a clean dry vessel.

Kaju katli is ready!

Serving suggestion:
Makes a rich dessert.
Number of slices: Can't remember that:) so please count them from the picture and lemme know :)

Event:
kaju Katli goes to 'Mehjabeen Arif's Iftar night' event.
Wishing you all a blessed ramadan too. Happy hosting dear!

Tuesday, August 9, 2011

Brinjal Raitha

When it comes to vegetable shopping, I can't finish without a  few eggplants. I am always excited to see the purplish ones (big American variety) but also love those with thorns (rare Vellore variety), green round brinjal with crunchy seeds (Thai variety), long purple brinjal (Chinese eggplant), the white buttery brinjal (Tirunelveli Vennai kathirikkai), white with purple stripes (Madras variety) .....OMG! I love all of them:) Click to read how this brinjal lover admires it and its origin:)
So I try as many recipes as possible with them till hubby thinks of other plans to stop me:)
Here is my favorite brinjal pachadi or raitha. Hope you all like it.

Broiled brinjal.

Ingredients:
Eggplant - 1 (100 gm / medium size)
onion - 2 tbsp
green chilly - 1
cumin powder - 1/4 tsp
plain Indian yogurt (fat free) - 1 cup
salt - to taste
curry leaf - 1 sprig
cilantro - 1 plant
mustard - 1/2 tsp
olive oil - 1 tsp

Method:
Apply a drop of oil all over the brinjal and stick a skewer to it.
Show it over burning flame and cook in that open fire till the eggplant's skin gets charred. We can do this in broiling mode in oven also, but it will take more time.
Let it cool.

Peel the skin and coarsely mash it.

Add finely chopped onion, green chillies, cilantro along with require salt and curd.

Heat a wok with a 1/2 tsp oil, splutter the mustard seed, curry leaves and pour over the raita. Sprinkle some cumin powder.

Brinjal raitha is ready!

Serving suggestion:
Serve with roti while making channa masala or any dal based curry.
Can be used as a dip also.

Tips:
Brinjals are low in calorie with more fiber. Good for intestines and relives gas problems. So traditionally they cook the lentils/ dals with brinjal.....e.g., brinjal sambar, mochai kathiri kulambu etc.

Sunday, August 7, 2011

Dry-fish curry

Karuvattu kulambu (Tamil), translated as dry fish curry is a popular curry made during the month of Aadi (mid July to mid August) in almost all the non vegetarian families of Tamilnadu. The devotees of Goddess Amman will gather together on a Sunday of that Tamil month and make this kulambu along with keppai kool(zh) and make an offering.Then that meal will be shared among the relatives and friends as holy food. I thought it will be apt to make a post on that famous 'Chennai Karuvadu kuzhambu' in this month.
Memories: While in Chennai we had / have a friendly neighborhood family. The lady of the house is my best friend till now and she is always praised for her caring nature to every one who comes to her. She usually celebrates this whole month with lot of poojas and we enjoy them together. She would bring a big share for all of us during that time. Also, I used to make this for my father-in law who is a big fan of this:)

Vegetarians can check out my mochai kottai kulambu:)

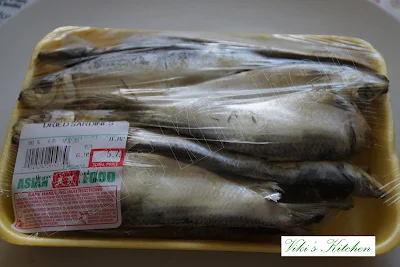
Dried sardines, I got from an  Asian grocery stores.
I used dried sardine (salai karuvadu / mathi meen karuvadu).Kulambu won't need much dry-fish, a little will bring out a lot of flavor. Being born and brought up in a land with abundant fish, I never thought dry-fish could be in this huge demand. Frankly speaking , many people in my home town won't admit their taste for this dry-fish in public. But we can't hide this flavor inside a house after preparing it:) Many Asian cuisines include dried fish in the sauce, noodles etc , but getting a decent one is a big challenge. As we all know the price of a commodity varies with demand, this understated Asian dried sardine is in a fairly high price here:)

Ingredients:
Dried Sardine - 4
(or) nethili karuvadu - 15 (or) any karuvadu piece - 150 gm.
Mochai kottai / val dhal - 1 cup
Baby Brinjal - 4
Drumstick (vegetable) - 1
Tomato - 2
Tamarind - small lime size
mustard - 1/2 tsp
fenugreek seeds- 1/2 tsp
curry leaves - 1 sprig
oil - 1 tbsp
asafoetida - 1 pinch
Red chilli powder - 1 tbsp
coriander powder - 4 tsp
turmeric powder - 1/4 tsp
water - 2 cups
salt - 2 tsp

To grind:
shredded coconut - 1/2 cup
shallot (nattu vengayam) - 5
cumin - 1 tsp

Preparation:
(If you are using the fresh beans then just start from the method.
otherwise go for pre soaking.)
Dry roast the mochai kottai, till u see dark spots on the outer layer and a nice aroma.
Then rinse it with water twice. Add water till it gets well immersed. Soak overnight or an hour.
Pressure cook for 3 whistles.
(we can cook it in stove top also, but it will take an hour).

Always store the dry-fish in freezer for safety.
De-freeze it by putting in water for 10 minutes. Scrap the tiny scales with a knife and remove them along with fins and intestine.
Wash well till the water runs clear. No need to slice it. Keep aside.

Method:
Cut drumstick into 2 inch pieces and make a small slit in each piece.
Cut the eggplant / brinjal into small pieces.
Soak the tamarind in hot water and extract juice using 2 cups of water.
Heat oil in a pan.
Crackle mustard seeds , add fenugreek seeds , curry leaves and asafoetida.
Then add the chopped tomato and fry till becomes mushy.
Then add the tamarind juice, salt, chilly powder, Turmeric, coriander powder.
Now add the cut vegetables with 2 cups water (use drained water from the cooked dal) and cook till the vegetables become tender.
Then add the cooked val dhal (mochai kottai) and bring it to a boil.
Put the masala paste and bring it to a boil. Then put the cleaned dry-fish and cook closed. Let it boil for 10 minutes and switch off.
Karuvattu kulambu is ready!

Serving suggestions:
The above can be served for 5 people.
This curry will stay fresh for 2 days in room temperature.
This is commonly served as side dish for keppai / kelviragu kool (finger millet porridge).
Otherwise, Serve hot with steamed rice and any vegetable side dish or with egg omlete.
Good with idly, dosa too.

Monday, August 1, 2011

Amla pickle

Amla is a medicinal fruit used on daily basis by Indians. Our elders would suggest it for many health issues like diabetes, improving hemoglobin content etc. So its a habit to prepare some pickle or jam or amla gulabjamun with this amla whenever we get it abundant. Fresh amla can be made into juice or made into amla buttermilk as a health drink. It is also proved that the medicinal value of the amla fruit will not diminish with preservative methods. Here is my version of Amla pickle, that can last long in room temperature.

Other names: Gooseberry pickles , Nellikkai urugai, Periya nellikkai oorukai.


Ingredients:
Amla - 25 (I used frozen)
gingelly oil - 1/2 cup
Vinegar (white) - 1/2 cup
red chilly powder - 1/2 cup
salt - 1/2 cup (per taste)
turmeric powder - 1/2 tsp
asafoetida (kayam / hing) - 1/4 tsp
To dry roast and grind:
mustard seed (kadugu)- 1 tbsp
fenugreek (venthayam) - 1 tsp

Method:
Wash the amla, pat dry with a clean kitchen towel and let dry in shade for an hour.
If using frozen ones, then just de-freeze them by keeping in room temperature.
Dry roast the items given and make a fine powder.

In a wok, pour the oil and let a tsp of mustard to crackle.
Then slide in the amla along with hing, turmeric and fry till it starts turning pale. Then add the red chilly powder , powdered masala, salt and fry well to get rid of the raw smell.

Let it cool completely. Then add the vinegar and mix well. Store it in a dry glass bottle / porcelain pickle jar.

Note:
*We can add lemon juice also , but I am not sure of the shelf-life.
*I have seen my mom preparing this pickle without vinegar or lemon. But it will need a good sun-drying process, lesser oil, great hygiene and little more salt. By prolonged sun-drying, that pickle can stay for an year or more in the cupboard.

Updated on Jan 24, 2013:
I made this bottle of amla pickle (approximately) on Oct 31 2012. All those 6 days till we get power back, We both entertained ourselves with cooking , eating and talking and talking.

Ulunthu kazhi

Ulunthu Kali is a highly energetic food, rich in protein and vitamins. This kaLi is given to girls who have reached puberty for nearly 16 da...